Three Point Lighting Basics
Whether you talk about photography, animation, film or even 3D rendering, any type of visual medium relies heavily on lighting in order to convey the message that you are trying to send in an adequate way.
Good lighting is crucial, and getting good lighting can be very difficult.
Professionals who work in Hollywood or other industries that produce visual content constantly have to deal with how to replicate specific situations through their art, whether it is a sunset, a sunny day, light from realistic sources, or even if you just want a good looking portrait. This is why some basic lighting models were invented that allow photographers and artists to get a good reason, regardless of the situation. The most commonly used setup is called the three point lighting, and is something any aspiring visual art professional should know.
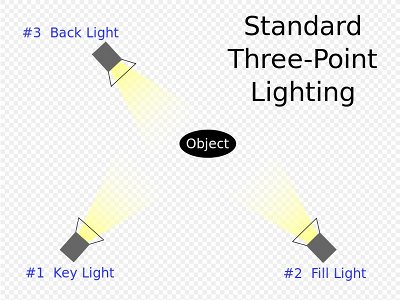
Before we go through what this system involves, it is important to note that the field of lighting is a complex one, and in order to get the best result, you will want to use one of many different setups available to you. But if you just want to get started, or achieve a decent result without spending a lot of time or money on your setup, then the three point lighting is the best way to achieve that. As the name says, this system involves three specific lights. The first one is called the key light, or highlight. It is a frontal light source which illuminates your target. For example, if you are a photographer attempting to take a portrait, then your key light would be the light that shines in your model’s face. To get the best result, you typically want to position it slightly to the side of the camera and up. For this one you can use a spot, or some other directional light. The second source is called the fill light, and it provides the ambient lighting. Here you may want to use a light panel, or a source which will spread your light all around. You can place it slightly lower and on the other side of the camera.
Finally, the third light is called the back light, and should be used to light the back of your model so that they can have a small glow, a visible shine from behind. It is usually positioned lower and to one side. It helps provide an highlight around the silhouette of your model, or the object you are filming. Together, these three lights provide a good basis for a photo or video, providing enough lights and shadows to make your subject look good in almost any situation. This is a setup that anyone can do, and does not cost a lot of money, since you can achieve this result with just three simple lights. Of course, should you wish to get more control over your lighting, then you can start looking at four point lighting and other, more complex lighting setups.
Written by Dendory.
[shareaholic app="share_buttons" id="4703992"][shareaholic app="recommendations" id="4704000"]